| Copyright August 15, 2003 |
Vern Lindberg
|
1. Vernier scales
2. The Vernier Caliper
3. Digital Electronic Calipers
| Term | Brief definition |
| Caliper | A tool that can be used to measure outside dimensions, inside dimensions, or depths of holes. |
| Instrument least count | The size of the smallest division on a scale. For the main scale on the common vernier caliper this is probably 0.1 cm. With the vernier scale the least count might be 0.002 cm. |
| Main Scale | The scale on the larger, fixed portion of the caliper. It gives the most significant digits in the reading. Make the reading to the nearest least count of the main scale opposite the zero of the vernier. |
| Vernier scale | The scale on the smaller sliding portion of the caliper. It gives the least significant digits in the reading, and sub-divides a mark on the main scale into 10, 20, or 50 subdivisions. Read the vernier scale at the point where a vernier line and a main scale line best line up. Combine the main scale reading with the vernier scale reading to get a final reading. |
Part I Uncertainties and Error propagation |
Part II Graphing |

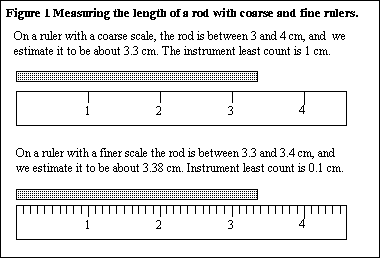
The ability to use high precision scales is limited by the spacing between the marks. Thus it is easy to have a least count of 1 mm, more difficult to have a least count of 0.2 mm, and virtually impossible to have a least count of 0.002 mm (a human hair has a diameter of about 0.050 mm.) In order to increase precision we need an auxiliary scale called a vernier scale. The vernier scale subdivides the least count from the main scale into 10, 50 or 100 subdivisions. Vernier scales are found on a wide range of instruments. In Section 2 we will discuss the vernier caliper.
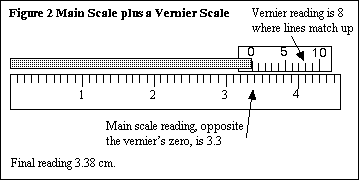
Any instrument that uses a vernier will have two scales, a main scale and a vernier scale as is seen in Figure 2. A measurement is made by combining the readings from the two scales.
The main scale works just like a ruler: the 0-mark on the vernier is compared to a main scale and the result is written down. Use the mark next to the zero, not the mark next to the edge of the vernier. Be sure to record the value of the main scale mark that is just to the left of the vernier zero mark as is shown in the above diagram. That is, record the value of 3.3 cm rather than 3.4 cm, even though the answer is closer to 3.4 cm.

Now look closely at the vernier scale in Figure 2. Notice that 10 divisions on the vernier match 9 divisions on the main scale. This guarantees that one of the vernier markings will line up exactly with a mark on the main scale. Decide which vernier mark comes closest to matching a main scale mark, in our example this is vernier mark 8. Combine the two readings to give the final length of 3.38 cm.
Common mistakes:
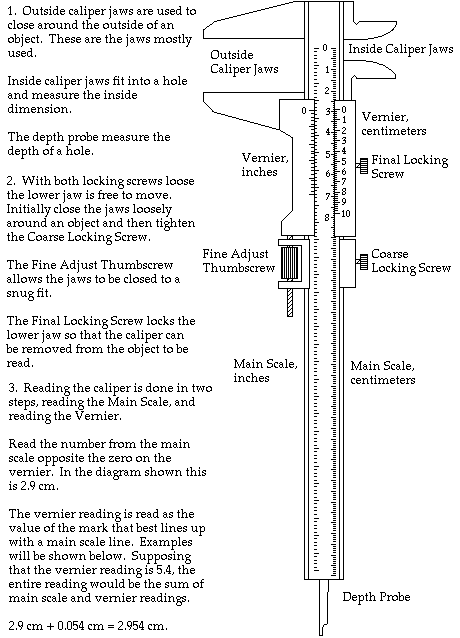
We will most often measure outside diameters. One jaw of the caliper is fixed, and the other jaw moves and is connected to the vernier.
Figure 3. A complete vernier caliper

You may be using electronic calipers. These have an electronic readout rather than a vernier scale. Typically an electronic caliper will have three buttons, an on/off button, an English/Metric button, and a Zero button. The procedure of using an electronic caliper is: